Importing Office Documents
DMS can store and help you manage Office documents. This section explains how to import any document into Ektron’s Document Management System.
Methods for Importing Documents
Ektron CMS400.NET provides several ways to import Microsoft Office documents. They are described below.
Warning! You cannot simply place files in the siteroot/assets or siteroot/PrivateAssets folder then manage them using Ektron CMS400.NET. You can only import documents using one of the methods listed below.
Note: Only users with Add permission for a folder can import documents to it. See Also: Folder Permissions.
Also, you cannot import to a folder for which XML Smart Forms are required. See Also: Requiring Smart Forms
|
Method |
Advantages |
Disadvantages |
Supported browsers |
For more information, see |
|---|---|---|---|---|
|
New > DMS Document from View Contents of Folders screen |
Can enter Summary, Metadata, etc. for each document Can create unique title for each document Can check in or submit for approval |
Can only upload one document at a time |
Internet Explorer Firefox Google Chrome Safari |
|
|
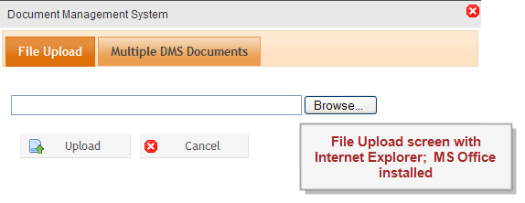
New > Multiple DMS Documents from View Contents of Folders screen |
Can upload several files at once Can apply same summary, metadata, etc. to all files Can check in or submit for approval |
Document title taken from Windows file name |
Internet Explorer with MS Office |
|
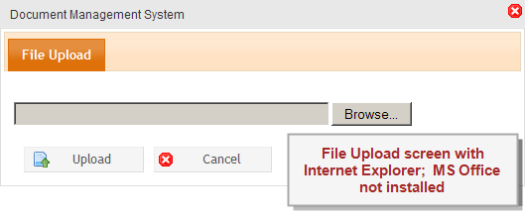
| Add Asset toolbar button > File Upload tab |
|
Document title taken from Windows file name Can only upload one document at a time No check-in or save option |
Internet Explorer Firefox Google Chrome Safari |
Add Assets Button: File Upload Tab |
|
Add Asset toolbar button > Drag and drop tab |
Can upload several files at once Can drag/drop folder structure; Ektron CMS400.NET recreates it in Workarea Can apply same metadata and taxonomy category to all uploaded documents |
Document title taken from Windows file name No check-in or save option |
Firefox |
|
| Add Asset toolbar button > Multiple DMS Documents tab |
Can upload several files at once |
Document title taken from Windows file name No check-in or save option |
Internet Explorer with MS Office |
Same as Adding Documents Using the Multiple DMS Documents Option except there is no check-in option |
|
Drag and drop to mapped network folder |
User doesn’t need to install or learn CMS software Can drag/drop folder structure; Ektron CMS400.NET creates it in Workarea |
Document title taken from Windows file name Content is in checked in status; submitting for publishing is separate step Cannot assign language to content Cannot work with content in language other than computer’s default |
|
How Imported Documents are Named
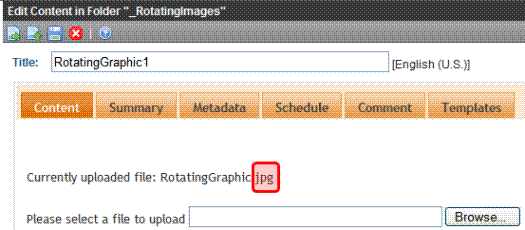
When you use the New > DMS Document file import option, you enter an Ektron CMS400.NET title for the file. When you import a file using any other method, its name is the file name without the extension. So for example, mypicture.jpg becomes mypicture in Ektron CMS400.NET.
While it may appear that the file extension was removed, it is retained and reappears for assets when you use the Edit option, on the View Contents of Folder screen (circled below).
The original file extension also appears when you check out.
You cannot import a file whose name and extension match a file already in the folder.
If you import a file of the same name but a different extension into the folder, the next available number is appended to the file name. For example, mypicture(2).
Adding Documents Using the DMS Document Option
To add an Office document via the New > DMS Document menu option, follow these steps.
Note:
1. From the Workarea, select the Content tab.
2. Select the folder in which you want to place the document.
3. The default language icon appears next to the screen title. To create a document for a different language, click View > Language and select the language.
4. Click New > DMS Document.
5. The following screen appears.

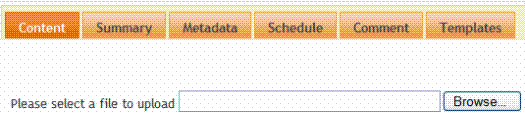
6. Click Browse and navigate to the file you want to import.
7. Enter a Title. It cannot include these characters: \, /, *,>, <,|
Note: If you want to retain the original document name, insert the full filename into the Title field. For example, you could enter mydocument.doc.
8. Use the Content Searchable checkbox to determine if the content should be searchable. See Also: Content Searchable.
9. If desired, add a summary, metadata, a schedule, and comments. See Also:
Scheduling Content to Begin and End
10. Check in or submit the content for publishing as you would HTML content.
Adding Documents Using the Multiple DMS Documents Option
To add Office documents to Ektron CMS400.NET via the New > Multiple DMS Documents menu option, follow these steps.
Note:
Note: This option requires Internet Explorer and Office 2003 or higher. Also, you must enable ActiveX controls in your browser settings.
To do this, open Internet Explorer and go to Tools > Internet Options > Security Tab > Custom Level button. Within that screen, under ActiveX controls and plugins, find Script ActiveX controls marked safe for scripting* and click Enable.
Warning! If you will apply the same information (Summary, Metadata, Categories, etc.) to several files, place those files in the same Windows folder before starting this procedure.
1. From the Ektron CMS400.NET Workarea, select the Content tab.
2. Select the Ektron CMS400.NET folder in which you want to place the documents.
3. The default language appears next to the screen title. To create a document for a different language, click View > Language and select the language.
4. Click New > Multiple DMS Documents.
5. The Edit Content in Folder screen appears. The lower portion of the screen resembles Windows Explorer.
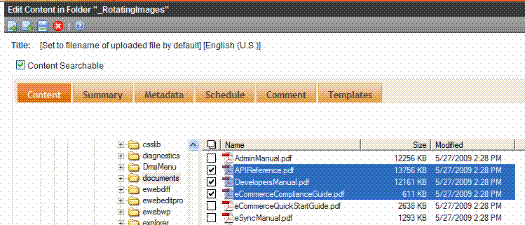
The left frame shows folders on your computer. The right frame shows files in the selected folder.
6. In the left frame, select the folder that contains files you want to upload.
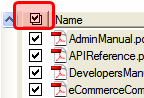
7. In the right frame, check the box next to each file you want to upload. To select all files in the folder, check the box in the header (circled below).
Note: You can only import files from one folder at a time.
8. If appropriate, enter the files’ summary, metadata, schedule, tasks, comments, or category. Any information you enter is applied to all selected files. See Also:
Scheduling Content to Begin and End
9. To check in the files, click Check In ( ) from the top left corner.
To submit the files into the approval chain, click Submit ( ) or Publish (
 ).
).
Adding Documents Using the Add Assets Button
The following table describes your options when using the Add Assets toolbar button (circled in the figure below) to add documents.
The options that appear when you click Add Assets vary depending on your browser, as shown below.
|
Browser |
Add Asset screen options |
For more information, see |
|---|---|---|
|
Internet Explorer without MS Office Google Chrome Safari |
File Upload | Add Assets Button: File Upload Tab |
| Internet Explorer with MS Office |
File Upload Multiple DMS Documents |
Add Assets Button: File Upload Tab Same as Add Assets Button: Drag Drop Tab except there is no check-in option |
| Firefox |
File Upload Drag and Drop |
Add Assets Button: File Upload Tab
When using File Upload tab, you upload one file at a time. Follow these steps to upload files.
1. From the Ektron CMS400.NET Workarea, select the Content tab.
2. Select the folder in which you want to place the documents.
3. The default language appears next to the screen title. To create the documents in a different language, click View > Language and select the language.
4. Click Add Assets (circled below).
5. The File Upload screen appears. As explained in Adding Documents Using the Add Assets Button, the screen's appearance can vary.

6. Click the File Upload tab.
7. Click Browse or Choose File.
8. Navigate to the folder whose asset you want to upload.
9. Select a file.
10. Click Upload.
If the asset's file type is not supported, an error message appears.
Note: If your Web site uses an https secure site setting, you may see errors after uploading assets. If this occurs, open your site’s web.config file and change the value of the add key="ek_UseSSL" setting to true.
11. If Ektron CMS400.NET requires you to apply metadata or a taxonomy category to the content, the following screen appears.
Note: Your system administrator creates the metadata screen. The image below is an example of how it might look.
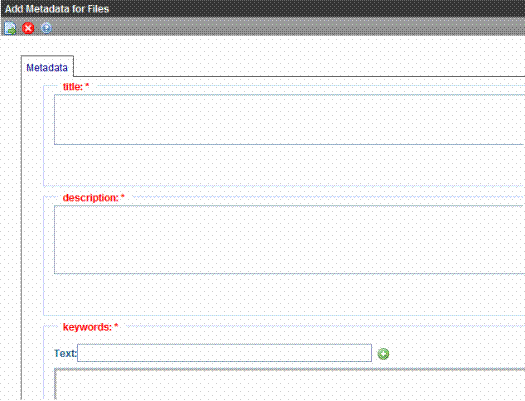
12. Required metadata field labels are red and have an asterisk (as title does above). Complete all required metadata. See Also: Working with Metadata
13. If the Category tab appears, apply at least one taxonomy category to this asset. See Also: Taxonomy
The status of an uploaded asset depends on the approval chain.
If you are the last approver, or if there is no approval chain, its status is Approved.
If there is an approval chain and you are not the last approver, its status is Checked In (I).
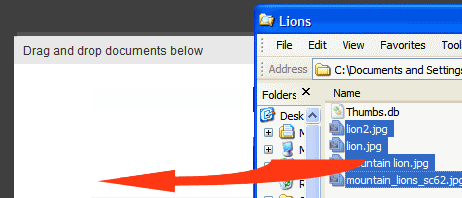
Add Assets Button: Drag Drop Tab
Note: The Drag Drop tab is available only if your browser is Firefox.
When using drag and drop, you can choose individual files or a folder. If you choose a folder, its structure is recreated in Ektron CMS400.NET even if it is several levels deep.
1. From the Ektron CMS400.NET Workarea, select the Content tab.
2. Select the Ektron CMS400.NET folder in which you want to place the documents.
3. The default language appears next to the screen title. To create the documents in a different language, click View > Language and select the language.
4. Click Add Assets (circled below).
5. The drag and drop window appears.
Note: If you are using Ektron CMS400.NET with the FireFox browser for the first time, see Installing FireFox Plug In.
6. Click the Drag Drop tab.
7. Resize Ektron CMS400.NET so that it occupies the left half of the screen.
8. Open Windows Explorer. Resize it so it occupies the right half of the screen.
9. Find the folder or assets you want to upload.
10. From Windows Explorer, drag and drop a folder or assets into the drag and drop window.
11. The following screen appears.
If an unsupported asset is chosen, an error message appears: An error occurred copying some or all of the selected files. However, all supported assets are uploaded. See Also: Importing Office Documents
Note: If your Web site uses an https secure site setting, you may see errors after dragging an dropping assets. If this occurs, open your site’s web.config file and change the value of the add key="ek_UseSSL" setting to true.
12. If Ektron CMS400.NET requires you to apply metadata or a taxonomy category to the content, the following screen appears.
Note: Your system administrator creates the metadata screen. The image below is an example of how it might look.
13. Required metadata field labels are red and have an asterisk (as title does above). Complete all required metadata. See Also: Working with Metadata
14. If the Category tab appears, apply at least one taxonomy category to this asset. See Also: Taxonomy
The status of the dragged and dropped documents depends on the approval chain.
If you are the last approver, or if there is no approval chain, its status is Approved.
If there is an approval chain and you are not the last approver, its status is Checked In (I).
Adding Documents to a Mapped Network Folder
You can set up a mapped network folder then drag and drop folders or assets into it. The advantage of this method is that you can upload documents without installing or learning how to use Ektron CMS400.NET.
When using drag and drop, you can choose individual assets or a folder. If you choose a folder, Ektron CMS400.NET recreates that folder structure, even if it is several levels deep. After the assets are uploaded, they are set to Checked In status.
You can also delete and move assets using the mapped network folder.
This section explains these procedures.
Language Restrictions on Content in a Mapped Network Drive
Setting up a Mapped Network Drive
Dragging and Dropping Assets into a Mapped Network Drive
Viewing Managed Files in a Mapped Network Drive
Removing Mapped Network Drives
Language Restrictions on Content in a Mapped Network Drive
You cannot choose a language for assets in a mapped network folder-- they are automatically assigned the Ektron CMS400.NET default language (set in the siteroot/web.config file at the ek_DefaultContent Language element).
And, you cannot work with assets of a language other than your computer’s default language. For example, if your computer’s default language is English and your version of Ektron CMS400.NET has Spanish content, you cannot edit that content in a mapped network folder.
Setting up a Mapped Network Drive
Prerequisites:
The path to your Ektron CMS400.NET Web site. It is something like this: http://server23/CMS400. If you do not know the path, ask your system administrator.
an Ektron CMS400.NET user name and password
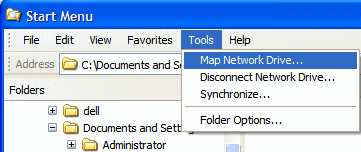
1. Open Windows Explorer.
2. Click Tools > Map Network Drive.
3. The Map Network Drive screen appears. Click Sign Up for Online Storage or Connect to a Network Server.
4. A wizard screen appears. Click Next.
5. Another wizard screen appears. Click Choose another network location. Click Next.
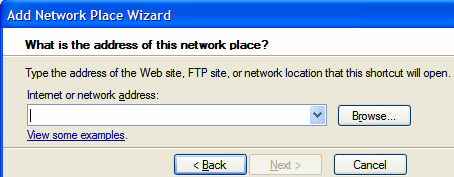
6. A third wizard screen appears. Enter the path to your Ektron CMS400.NET site, followed by the ekdavroot folder. For example, http://server23/CMS400/ekdavroot. Click Next.
Warning! If your computer runs Microsoft Vista and you see this error message The folder you entered does not appear to be valid. Please choose another, refer to this Ektron KB article: http://dev.ektron.com/kb_article.aspx?id=15176.
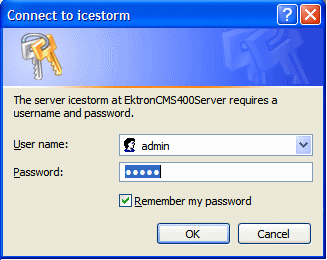
7. A login screen appears (see below). Enter your Ektron CMS400.NET username and password. Click OK.
8. Another wizard screen appears. Name the folder. You will use this name to identify the folder when you want to drag and drop assets to it. Click Next.
9. The Finish screen appears.
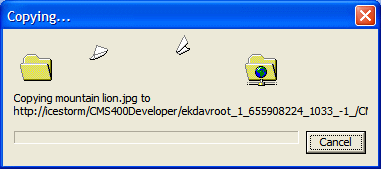
Dragging and Dropping Assets into a Mapped Network Drive
Use Windows Explorer to drag and drop folders or assets into the mapped network folder.
Warning! If a Windows folder has more than 1500 files, Windows Explorer may time out while trying to open it. To remedy this problem, divide your files in that folder into several child folders.
1. Open Windows Explorer. Resize it so it occupies the left half of the screen.
2. Open the folder that contains the folders or assets you want to upload to Ektron CMS400.NET.
3. Open a second instance of Windows Explorer. Resize it so it occupies the right half of the screen.
4. In that window, open My Network Places. Under that, find the mapped network folder you created in Setting up a Mapped Network Drive.
5. A login screen appears. Enter your Ektron CMS400.NET username and password. Click OK.
6. Open the Ektron CMS400.NET folder into which you want to upload assets or folders.
7. From the left window, drag and drop assets or folders into the mapped network folder.
If any of the assets being uploaded is not supported, an error message appears: An error occurred copying some or all of the selected files. However, all supported assets are uploaded. See Also: Importing Office Documents
Viewing Managed Files in a Mapped Network Drive
If you want to view individual managed files within a mapped network drive folder, follow this procedure.
1. Open the site root/web.config file.
2. Go to this line:
<!--remove verb="GET,HEAD,POST" path="*"/-->
3. Remove the comment characters (in red above).
4. In the following lines, insert beginning and ending comment characters as shown in red below.
<!--add verb="GET,POST" path="*.doc" type="Ektron.ASM.EkHttpDavHandler.EkDavHttpHandlerFactory"/>
<add verb="GET,POST" path="*.docx" type="Ektron.ASM.EkHttpDavHandler.EkDavHttpHandlerFactory"/>
<add verb="GET,POST" path="*.xls" type="Ektron.ASM.EkHttpDavHandler.EkDavHttpHandlerFactory"/>
<add verb="GET,POST" path="*.xlsx" type="Ektron.ASM.EkHttpDavHandler.EkDavHttpHandlerFactory"/>
<add verb="GET,POST" path="*.ppt" type="Ektron.ASM.EkHttpDavHandler.EkDavHttpHandlerFactory"/>
<add verb="GET,POST" path="*.pptx" type="Ektron.ASM.EkHttpDavHandler.EkDavHttpHandlerFactory"/>
<add verb="GET,POST" path="*.vsd" type="Ektron.ASM.EkHttpDavHandler.EkDavHttpHandlerFactory"/>
<add verb="GET,POST" path="*.vsdx" type="Ektron.ASM.EkHttpDavHandler.EkDavHttpHandlerFactory"/-->
<!-- Enable the line below and remove all office specific mappings above for Server 2003 with
private assets and enable remove verb command-->
5. Go to this line:
<!--add verb="GET,HEAD,POST" path="*" type="Ektron.ASM.EkHttpDavHandler.EkDavHttpHandlerFactory"/-->
6. Remove the comment characters (in red above).
After you make this change, you can click to view any image file in the ekdavroot folder.
Removing Mapped Network Drives
Ektron CMS400.NET’s DMS feature creates a mapped, ekdavroot network drive for many functions. For example, if you sign on to Ektron CMS400.NET and create a new folder, a new mapped, ekdavroot network drive is created.
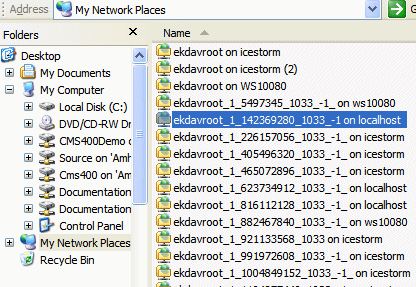
If you find that ekdavroot folders clutter up your My Network Places folder, you can delete them. Deleting ekdavroot folders has no impact on your ability to use Ektron CMS400.NET.
Editing an Office Document
There are two ways to edit an Office document if you are using the Internet Explorer browser and Office is installed on your computer.
Edit Using a Mapped Network Folder
Note: Firefox users should download the Office document to their computer, edit it using Office, then drag and drop the asset back into CMS400.NET.
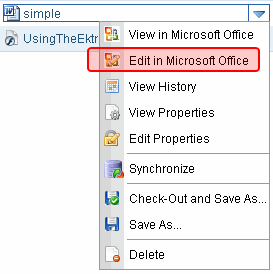
Edit in Microsoft Office
Prerequisites
Your computer has MS Office.
The Internet Explorer browser. You cannot use Firefox.
To use this option, click the document from the Ektron CMS400.NET folder and select Edit in Microsoft Office from the dropdown menu.
The document opens within Office. Make your changes and save it. When you do, the revised version is saved to Ektron CMS400.NET.
Note: If you want to edit the document’s Summary, Metadata, Schedule, Comment, Task, or Taxonomy category information, click the asset from the Ektron CMS400.NET folder, then select Edit Properties from the dropdown menu.
When you begin to edit the document, its status changes to Checked Out (0). When you make your changes and save, it is Approved.
See Also:
Scheduling Content to Begin and End
Administering the Web Alert Feature
Edit Using a Mapped Network Folder
You can edit an Office document directly from a mapped network folder. To do that, follow these steps.
1. Set up a mapped network folder, as described in Setting up a Mapped Network Drive.
2. Use Windows Explorer to open the folder.
Note: If any Windows folder has more than 1500 files, Windows Explorer may time out while trying to open it. To remedy this problem, divide your files in that folder into several child folders.
3. Open a document using Office, make changes, and save it.
You can also delete and move documents using the mapped network folder.
The document is now in checked into Ektron CMS400.NET, and can appear on your Web site when approved. Also, a history of every saved version is retained so you can restore previous ones if necessary. You cannot enter or change Ektron CMS400.NET document information (Summary, Metadata, etc.) in the mapped network folder -- someone must use Ektron CMS400.NET to do that.
Status of Document Saved to Mapped Network Folder
The status of a document saved to a mapped network folder depends on the approval chain and the user who signed in when the mapped network folder was created.
If you are the last approver, or if there is no approval chain, its status is Approved.
If there is an approval chain and you are not the last approver, its status is Checked In (I).
Also, if the content’s folder requires metadata or a taxonomy category which has not been entered, its status is Checked In (I).
Deleting an Office Document
Note: You must have delete permissions for the folder that contains the document. See Also: Folder Permissions.
Note: It is good practice to check for broken quicklinks before deleting documents. See Link Checking.
To delete an Office document, follow these steps.
1. Navigate to the Workarea’s Content folder.
2. Open the folder that contains the document.
3. Place the cursor over the document
4. Hover the cursor over the triangle ( ) on the right end of the document and click. A dropdown menu appears.
5. Click Delete.
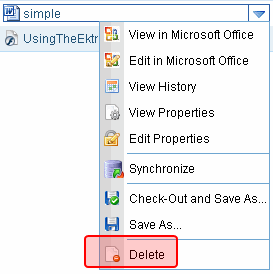
Note: If you do not see Delete, either you lack permission to delete the content or its status makes it ineligible for deleting.
6. The following message appears.
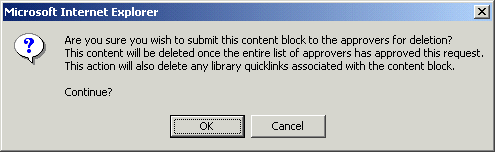
7. Click OK to delete the document.
Like publishing, deleted content must go through the approval chain before it is removed. If you are the last approver in the approval chain, the content is deleted immediately. See Also: Approve/Decline Content
Checking Out, Saving, and Replacing an Office Document
If you check out and save an Office document to your computer, you would typically edit it using Office. While it is checked out, only you or a system administrator can check it back in. Other users cannot edit it. You may use this feature to work on the document on your computer, copy it to another computer, or even email it to someone who does not have access to Ektron CMS400.NET.
You can also use the Check Out and Save As option to edit an Office document if you use the Firefox browser. Firefox does not let you edit Office documents within Ektron CMS400.NET, as you can with Internet Explorer. To work around this limitation, check out the Office document, save it to your computer, and edit it.
When all edits have been entered, drag and drop the document back to Ektron CMS400.NET.
Follow these steps to copy an Office document to your computer, edit it, then replace the version in Ektron CMS400.NET.
Warning! There are several ways to import a document into Ektron CMS400.NET. Some methods retain the original file name while others let the user assign a name.
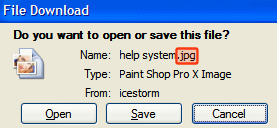
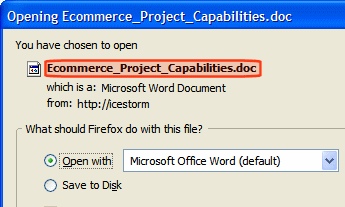
Warning! When you check out and save a document to your computer, it is saved under the original file name, which may be different from its Ektron CMS400.NET name. The original file name is on the screen that appears after you select Check out and Save as (circled below).
Warning!
Make note of the original file name, because you use it to identify the file after it is saved to your computer.
1. In Ektron CMS400.NET, open the folder that contains the Office document.
2. Hover the cursor over the triangle () on the right end of the document and select Check out and Save As.
3. You are prompted to open or save the document. Click Save.
4. Select a folder to which you want to save the document.
5. The document’s status changes to checked out (O).
6. Edit the document in Office.
Note: If you change your mind and do not change the document, but simply close Office, the document remains Checked Out (O). Use the Check In menu option to check it in.
7. Drag and drop the edited document. See Importing Office Documents.
8. You are asked to confirm the file replace. Click Yes.
9. The document is submitted for approval.
10. The revised document is saved in Ektron CMS400.NET.
Saving an Office Document
You would typically save an Office document to your computer in order to distribute it to others, or if you want a personal copy. You should not save a document to your computer if you plan to edit it then replace the version in Ektron CMS400.NET -- doing this may overwrite edits made by other users.
If you want to edit a document, use the Edit in MS Office or Check out and Save As menu option. Both options set the content to checked out status, which prevents non-administrator users from editing it until you check it back in.
Follow these steps to save an Office document.
1. In Ektron CMS400.NET, open the folder that contains the Office document.
2. Hover the cursor over the triangle () on the right end of the document and click Save As.
3. You are asked if you want to open or save the document. Choose Save.
4. Select a folder to which you want to save the document.
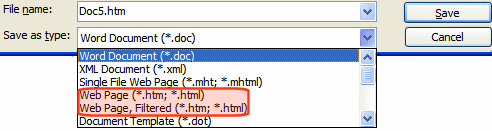
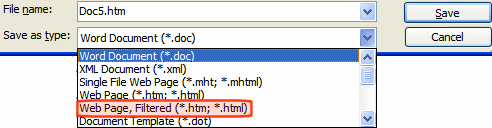
Saving an Office Document in .html Format
This feature converts Office documents to HTML format, which means they are formatted to display within a browser. As a result, anyone visiting your site can view the document, whether or not Microsoft Office is installed on their computer.
Warning! Only Microsoft Word and Excel documents can be published as HTML. Ektron CMS400.NET does not support saving Powerpoint or Visio documents as HTML.
There are two ways to save an Office document in .html format.
|
Method |
Advantages |
For details, see |
|
1. Drag and drop Office document into Ektron CMS400.NET. 2. Use Edit in MS Office option to save it in html format. |
You don’t need to know the path to your Web site’s root folder. |
|
|
1. Open an Office document on your computer. 2. Save it in html format to the ekdavroot folder in your Web root. |
You don’t need to drag and drop document to Ektron CMS400.NET |