Adding a New Smart Form
When adding a new Smart Form, you have two options. The following sections explain both.
Adding a Smart Form Using the Data Designer (recommended)
Adding a Smart Form Using External XML Files (for example, XSLTs, schemas, etc.)
Note: To create a new Smart Form by copying and editing an existing one, see Creating Smart Forms Based on Existing Configurations.
Adding a Smart Form Using the Data Designer
To add a Smart Form using the WYSIWYG Data Designer, follow these steps.
1. From the Ektron CMS400.NETWorkarea, choose Settings > Configuration > Smart Form Configurations.
2. Click Add Smart Form ( ).
).
3. The Add Smart Form screen is displayed.
4. Enter a Title for the Smart Form.
5. Click Save ( ).
).
6. The Smart Form Data Designer screen appears.
Note: If your computer runs Windows and your server’s web.config file is set to use eWebEditPro+XML, Ektron CMS400.NET checks to see if eWebEditPro+XML is installed on your computer. If it is not, you are prompted to install it.
![]()
7. If eWebEditPro+XML is being installed, you may get the following error dialog.
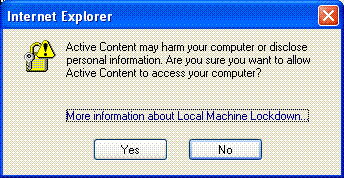
To learn about why the dialog is appearing and help decide whether to click Yes or No, click the link More information about Local Machine Lockdown. A Windows Help topic appears and explains your options.
8. Design your Smart Form configuration in the Data Designer.
See Using eWebEdit400to Create Smart Forms for information about creating XSLTs using the Data Designer.
9. Click Update ().
You are ready to assign the Smart Form to a folder or content item. See Assigning Smart Forms to a Folder for more information.
Adding a Smart Form Using External XML Files
Warning! Release 7.5.2 and up of Ektron CMS400.NET supports two editors: eWebEditPro+XML and eWebEdit400. If you want users to insert Smart Form information using eWebEdit400, you cannot create or edit Smart Forms using external files. However, you can access eWebEdit400's source view, paste the external file's XML, then return to design view.
To add a Smart Form using eWebEditPro+XMLand external XML files, follow these steps.
1. In the Workarea, go to Settings > Configuration > Smart Form Configuration.
2. Click Add Smart Form ().
3. The Add Smart Form screen is displayed.
4. Enter a Title for the Smart Form.
5. Click Save ().
6. The Smart Form Data Designer screen is displayed.
7. Click Back arrow ( ) to exit.
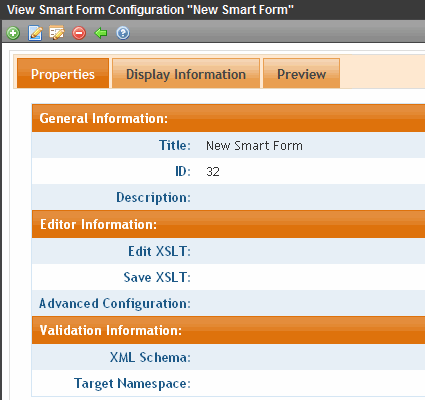
8. The View Smart Form screen for the new Smart Form is displayed.
9. Click Edit ( ).
).
10. The Edit Smart Form screen is displayed.
11. Enter the necessary information using the following table as a reference.
Smart Form Fields
|
Section |
Field |
Description |
|
Generic Information |
Title |
Name given to Smart Form. |
|
ID (display only) |
ID number assigned when configuration is created. |
|
|
Description |
Detailed description given to configuration by its creator or last editor. |
|
|
Editor Information |
Edit XSLT |
XSLT applied to content while being edited. |
|
Save XSLT |
XSLT used to transform the XML when saved to the database. |
|
|
Advanced Configuration |
XML file that contains display information, schema validation, and other advanced XML data. |
|
|
Validation Information |
XML Schema |
The .xsd file used to validate the XML content |
|
Target Namespace |
The default namespace used for outgoing XML |
|
|
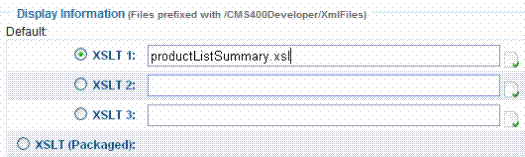
Display Information |
XSLT1 |
XSLT 1 applied to XML data when viewed on a device |
|
XSLT2 |
XSLT 2 applied to XML data when viewed on a device |
|
|
XSLT3 |
XSLT 3 applied to XML data when viewed on a device |
|
|
XSLT Packaged |
XSLT package applied to XML data when viewed on a device |
Note: When a Smart Form is created using the Data Designer, a default XSLT is created based on the configuration. To learn about modifying the packaged XSLT, see Editing a Smart Form’s XSLT.
12. Specify the default display XSLT for the configuration by clicking the corresponding radio button.
13. Click Save ().
XML File Verification
A verification button ( ) appears to the right of some fields on the Add Smart Form screen. After you identify an XSLT or schema, you can click this button to verify that the file
exists in the location specified
contains well-formed XML
Note: The XML Verification feature does not validate the contents of the XML file.
The following table explains possible results when clicking the verification button.
|
Display |
Result |
Description |
|
|
Verified |
File passes all verification parameters |
|
|
Not Verified |
The file either: Does not exist in the specified location Does not contain well-formed XML Review current settings. Ensure the file is in the proper location, and that it contains well-formed XML |

